
Self-hosted GitHub pages
13 September 2017
GitHub pages is a great way to host a simple website or blog when you do not need dynamic pages, a database and logins. When you set it up it is hosted by the Github infrastructure and whenever you push changes to GitHub, a few seconds later the changes appear on you website. But in some cases it might be interesting to host your website yourself. This gives you more control of the webserver, you can use SSL (and you should) and you can use all sorts of plugins to add to your website. Besides that, this guide is a great introduction to building you Jekyll website on Digital Ocean.

Introduction
Sites on GitHub pages are are plain Html files or generated Html files from markdown via Jekyll. GitHub pages has a strict set of plugins you can use. There is no way to add plugins (besides building your site on your local machine with Jekyll and committing the generated files). By running your own server with your site on it, you can use extra plugins.
Even better, on your own server you can add an SSL certificate (not included in this guide). This will make the connection to your site secure and it will rank your site higher on Google.
And most of all, I think managing your own server is fun and educational.
Note: This guide assumes that you are familiar with SSH, Unix and some basic commands.
⚠️ Security
❗️ Important! This guide will not focus on security for now. This is just to get you going with your own server, building your Jekyll page and serving it. Things you should do yourself; add backups, add firewall rules, secure Nginx, add SSL, use a non-root user and more.
Getting started with your first server
When you have your own server hosting your website, you are in full control of whatever happens on the server. You could serve your website from home using a spare computer you might have, or even a raspberry pi. For small websites this is fine, but if your site has a lot of traffic this could affect your home internet connection and you would need to keep it up and running 24/7.
Instead, use a virtual server or VPS. Located in a datacenter on high-end infrastructure and a fast internet connection. This is a great way to get started with your first server.
There are several providers that offer virtual servers. I would recommend using Digital Ocean to start with. This is a cheap way to try out a Linux server.
Get $10 worth of free Digital Ocean credit when you sign up through my Digital Ocean referral link.
Creating a new server
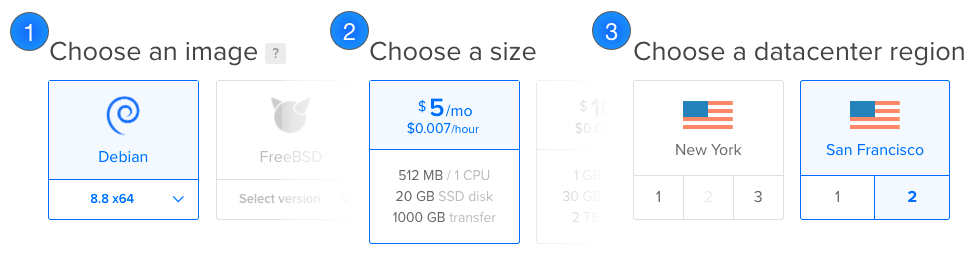
After registering at Digital Ocean, create a new server. These are called Droplets at Digital Ocean. The smallest Droplet will do. Use the Debian 8.8 x64 image and pick the datacenter location closest to you.
After creating the Droplet, the server will start within a few minutes. You will receive an email with the root ssh login details.
Server configuration
With your new server created, it is time to configure the server. Log in to your server using SSH. If this is the first time you log in to your server, it might ask you to change the default root password.
ssh root@YOUR_SERVER_IP
Packages
To begin with, the apt-get package manager must be updated. After that a few packages we need must be installed to build and serve your website. Git will clone it, Ruby/Jekyll will build it and Nginx will serve it.
$ apt-get update
$ apt-get install build-essential git ruby-dev nginx libz-dev
Nginx should now be installed. Enter your server IP in a browser and you should see the default Nginx webpage.
Ruby gems and Jekyll
Jekyll and some other Ruby dependencies are installed via Gems. These commands might take a while, so be patient.
$ gem update --system
$ gem install bundle nokogiri jekyll
Build your website
Clone your GitHub repository into a new my_website directory. The exact git url will be different in your case, but your command should look something like this:
$ git clone https://github.com/username/username.github.io.git my_website
This will pull all the files from your repository and store them in the my_website directory.
To install all jekyll dependencies your website might have, install them using the following command.
This assumes you use bundler and have a Gem-file in your repository, defining the required gems.
In most cases the github-pages-gem is all you need. See my repository for an example gem file.
$ cd my_website
$ bundle install --path vendor/bundle
This will install the gems in a vendor directory, so instead of installing them globally, they are specific for this repository.
Now that everything is setup, it is time to build your Jekyll website. The default location Nginx looks for your files to serve is
/var/www/html, so by specifying a build destination, the generated files will be immediately served by the Nginx webserver.
$ bundle exec jekyll build --destination /var/www/html

Configuration file: /root/my_website/_config.yml
            Source: /root/my_website
       Destination: /var/www/html
 Incremental build: disabled. Enable with --incremental
      Generating...
                    done in 0.626 seconds.
 Auto-regeneration: disabled. Use --watch to enable.
💥 That’s it. If everything went well, your website should now be build and served. To try this, open a webbrowser and enter your server IP. Instead of showing the default Nginx page, it should now serve your website.
Rebuilding after code changes
When you’ve made changes to your website and committed them to GitHub, usually GitHub pages will immediately build your website and serve the new version. In our case we need to rebuild our site manually. This can be automated by creating a webhook that rebuilds after a code push to GitHub, but that’s outside of the scope of this guide.
When you pushed your changes and want your server to serve the new site, log in to your server using SSH, pull the new code and rebuild.
$ cd my_website
$ git pull
$ bundle exec jekyll build --destination /var/www/html
Your new changes should now be live.
Conclusion and what’s next
These are the first steps into getting your Jekyll or GitHub pages deployed on your own server.
A lot of improvements can and should be made. Mainly out of a security point of view you should not just follow this guide and think you are done. This tutorial uses the default or root user everywhere. Don’t do this! Create a user with limited permissions to clone and build your repository.
The current setup requires you to log in to the server, pull new code and build again. You could automate this, so new code is automatically deployed after a push to your repository.
When you follow this guide the website can be reached by entering the server IP in the browser. You most likely want to use a domain for this. Register a domain name and point it to the server IP.
When you want to host multiple sites on the same server, you would need to configure vhosts in Nginx to serve multiple sites.
To secure your site you should use an SSL certificate. These can be bought, but you can also use Letsencrypt, which is free.
Besides these things there is a lot more you can or should do to harden your server and make it more secure.
Digital Ocean referral
As you might have noticed the article links to Digital Ocean a few times, using a referral link. Using this link you get $200 worth of free credit when you sign up, which you can use to create your first server. If you use my link i will get some credit as well. There is no “catch” for either you or me, so if you are considering signing up for Digital Ocean, please use my link:
https://www.digitalocean.com/?refcode=ce8c17473d2e - Thanks.
comments powered by Disqus